Tutorial
SanctuaryでAPI仕様をどのように記述するかを具体的な例を用いて説明します。より詳細な記法については、Referenceを参照してください。
初級編
パッケージとクラス
APIの定義はパッケージとクラスで名前空間を定義します。生成されるファイル(ヘッダファイル、HTMLファイル、TeXファイルなど)のファイル名は、パッケージ名とクラス名で決まります。
生成されるヘッダファイルのファイル名は、パッケージ名/クラス名.hになります。ただし、パッケージ名に含まれる_は/に展開されます。例えば、パッケージfoo_bar、クラスBazの場合、生成されるヘッダファイルはfoo/bar/Baz.hとなります。
生成されるHTML、TeXファイルのファイル名は、それぞれパッケージ名_クラス名.html、パッケージ名_クラス名.texになります。例えば、パッケージfoo_bar、クラスBazの場合、生成されるHTMLファイルはfoo_bar_Baz.htmlとなります。
入力するXMLファイルは次のような形式になります。
<?xml version="1.0" encoding="エンコード名"?>
<!DOCTYPE class SYSTEM "http://maroontress.com/Sanctuary/2.0/sanctuary.dtd">
<class package="パッケージ名" name="クラス名">
  ...
</class>
命名規則
APIの記述の前に、おおよその命名規則を次のように決めておきます。
- パッケージ名はすべて子文字で、必要なら
_で区切る(例:foo_bar) - クラス名、構造体のタグ名は大文字で始める(例:
FooBar) - 定数のマクロ名と列挙型の定数名はすべて大文字で、必要なら
_で区切る(例:FOO_BAR) - 引数付きマクロ名と関数名、構造体のメンバ名、グローバル変数は小文字で始める(例:
fooBar)
さらに識別子が衝突しないように、パッケージ名とクラス名を利用して、メンバ名以外の識別子にパッケージ名_クラス名_というプレフィックス(接頭辞)を付加します。ただし、例外的にクラスのインスタンスとなる構造体のタグ名はパッケージ名_クラス名にします。
例として、整数を扱うcom_exampleパッケージのクラスInteger0の記述を次に示します。
<?xml version="1.0" encoding="euc-jp"?>
<!DOCTYPE class SYSTEM "http://maroontress.com/Sanctuary/2.0/sanctuary.dtd">
<class package="com_example" name="Integer0">
  <define name="com_example_Integer0_MAX">
    <macro>0x7fffffff</macro>
  </define>

  <define name="com_example_Integer0_MIN">
    <macro>(-0x7fffffff - 1)</macro>
  </define>

  <typedef type="int" name="com_example_Integer0_t"/>

  <struct tag="com_example_Integer0">
    <member type="com_example_Integer0_t" name="value"/>
  </struct>

  <method name="com_example_Integer0_new">
    <param type="com_example_Integer0_t" name="i"/>
    <return type="struct com_example_Integer0 *"/>
  </method>

  <method name="com_example_Integer0_delete">
    <param type="struct com_example_Integer0 *" name="i"/>
  </method>

  <method name="com_example_Integer0_set">
    <param type="struct com_example_Integer0 *" name="i"/>
    <param type="com_example_Integer0_t" name="value"/>
  </method>

  <method name="com_example_Integer0_get">
    <param type="struct com_example_Integer0 *" name="i"/>
    <return type="com_example_Integer0_t"/>
  </method>
</class>このXMLファイルから生成されるヘッダファイルを次に示します。ヘッダファイルは二重インクルード防止のためのマクロパッケージ名_クラス名_Hでガードされます。
#ifndef com_example_Integer0_H
#define com_example_Integer0_H

#define com_example_Integer0_MAX 0x7fffffff
#define com_example_Integer0_MIN (-0x7fffffff - 1)

struct com_example_Integer0;

typedef int com_example_Integer0_t;

#if defined(__cplusplus)
extern "C" {
#endif

struct com_example_Integer0 {
    com_example_Integer0_t value;
};

struct com_example_Integer0 * com_example_Integer0_new(com_example_Integer0_t i);
void com_example_Integer0_delete(struct com_example_Integer0 * i);
void com_example_Integer0_set(struct com_example_Integer0 * i,
                              com_example_Integer0_t value);
com_example_Integer0_t com_example_Integer0_get(struct com_example_Integer0 * i);

#if defined(__cplusplus)
}
#endif

#endif /* !com_example_Integer0_H */
@展開
クラスInteger0ではプレフィックスcom_example_Interger0_が頻繁に現れるため、ヘッダファイルを直接書くより簡単になったとは言えません。プレフィックスを実体宣言と実体参照で記述するという方法もありますが、@展開を使用すればより簡単に記述することができます。
@展開とは特定の属性の値に含まれる@をパッケージ名_クラス名に置換する機能です。@展開を使用してクラスInteger0を書き直したクラスInteger1を次に示します。
<?xml version="1.0" encoding="euc-jp"?>
<!DOCTYPE class SYSTEM "http://maroontress.com/Sanctuary/2.0/sanctuary.dtd">
<class package="com_example" name="Integer1">
  <define name="@_MAX">
    <macro>0x7fffffff</macro>
  </define>

  <define name="@_MIN">
    <macro>(-0x7fffffff - 1)</macro>
  </define>

  <typedef type="int" name="@_t"/>

  <struct tag="@">
    <member type="@_t" name="value"/>
  </struct>

  <method name="@_new">
    <param type="@_t" name="i"/>
    <return type="struct @ *"/>
  </method>

  <method name="@_delete">
    <param type="struct @ *" name="i"/>
  </method>

  <method name="@_set">
    <param type="struct @ *" name="i"/>
    <param type="@_t" name="value"/>
  </method>

  <method name="@_get">
    <param type="struct @ *" name="i"/>
    <return type="@_t"/>
  </method>
</class>生成されるヘッダファイルはInteger0とInteger1の違いだけなので省略します。@展開の詳細はリファレンスの@展開を参照してください。
名前空間展開
確かに@展開で入力の手間を省くことができます。しかし、最初に決めたような命名規則を採用し、メンバ名を除く識別子にプレフィックスを必ず付加するのであれば、@展開よりも名前空間展開を使用した方が便利です。@展開とは異なり、名前空間展開では後述するインポートマクロを利用できるようになるからです。
名前空間展開とは特定の属性の値にパッケージ名_クラス名_を前置する機能です。ただし、属性の値が@のときはパッケージ名_クラス名に展開します。
名前空間展開を有効にするにはnamespace要素を指定する必要があります。名前空間展開を使用してクラスInteger1を書き直したクラスInteger2を次に示します。
<?xml version="1.0" encoding="euc-jp"?>
<!DOCTYPE class SYSTEM "http://maroontress.com/Sanctuary/2.0/sanctuary.dtd">
<class package="com_example" name="Integer2">
  <namespace/>

  <define name="MAX">
    <macro>0x7fffffff</macro>
  </define>

  <define name="MIN">
    <macro>(-0x7fffffff - 1)</macro>
  </define>

  <typedef type="int" name="t"/>

  <struct tag="@">
    <member type="@_t" name="value"/>
  </struct>

  <method name="new">
    <param type="@_t" name="i"/>
    <return type="struct @ *"/>
  </method>

  <method name="delete">
    <param type="struct @ *" name="i"/>
  </method>

  <method name="set">
    <param type="struct @ *" name="i"/>
    <param type="@_t" name="value"/>
  </method>

  <method name="get">
    <param type="struct @ *" name="i"/>
    <return type="@_t"/>
  </method>
</class>
このXMLファイルから生成されるヘッダファイルを次に示します。
#ifndef com_example_Integer2_H
#define com_example_Integer2_H

#define com_example_Integer2_MAX 0x7fffffff
#define com_example_Integer2_MIN (-0x7fffffff - 1)

struct com_example_Integer2;
typedef int com_example_Integer2_t;

#if defined(__cplusplus)
extern "C" {
#endif

struct com_example_Integer2 {
    com_example_Integer2_t value;
};

struct com_example_Integer2 * com_example_Integer2_new(com_example_Integer2_t i);
void com_example_Integer2_delete(struct com_example_Integer2 * i);
void com_example_Integer2_set(struct com_example_Integer2 * i,
                              com_example_Integer2_t value);
com_example_Integer2_t com_example_Integer2_get(struct com_example_Integer2 * i);

#if defined(__cplusplus)
}
#endif

#ifdef com_example_Integer2_IMPORT
#define Integer2 com_example_Integer2
#define Integer2_MAX com_example_Integer2_MAX
#define Integer2_MIN com_example_Integer2_MIN
#define Integer2_delete com_example_Integer2_delete
#define Integer2_get com_example_Integer2_get
#define Integer2_new com_example_Integer2_new
#define Integer2_set com_example_Integer2_set
#define Integer2_t com_example_Integer2_t
#endif /* com_example_Integer2_IMPORT */

#endif /* !com_example_Integer2_H */ヘッダファイルの終わりで定義されているマクロがインポートマクロです(詳細は次のセクションで説明します)。名前空間展開の詳細はリファレンスの名前空間展開を参照してください。
インポートマクロ
名前空間展開を使用した場合、インポートマクロを利用することができます。インポートマクロとは、ソースコードでパッケージ名を省略するためのマクロ定義です。インポートマクロを有効にするには、マクロパッケージ名_クラス名_IMPORTを定義してからヘッダファイルをインクルードします。例えば、マクロcom_example_Integer2_IMPORTを定義してから、パッケージcom_exampleのクラスInteger2のヘッダファイルをインクルードすると、クラスInteger2のインポートマクロが有効になります。
インポートマクロを有効にした場合、そのファイルのスコープではパッケージ名を省略することができるようになります。ただし、そのファイルのスコープでクラス名が衝突しない必要があります。
インポートマクロを定義してパッケージ名を省略するコードの例を次に示します。このコードはパッケージcom_exampleのクラスFooとクラスBarを使用しますが、クラスFooに関してはインポートマクロを使用してパッケージ名を省略しています。
#define com_example_Foo_IMPORT

#include <com/example/Foo.h>
#include <com/example/Bar.h>

int main(void)
{
  struct Foo foo;
  struct com_example_Bar bar;

  Foo_init(&foo);
  com_example_Bar_init(&bar);
  ⋮
}もちろん、インポートマクロに相当するものを手で書くこともできますが、それはあまりにも非生産的な行為です。そしてもっと酷いのは、クラス名が衝突するわけでもないのに、ひたすらプレフィックス(実際はcom_example_よりは短いでしょうが...)をAPIの利用者が入力するように強要することでしょう。
⚠️ インポートマクロを利用してもリンカから見えるシンボルに影響はありません。
実体宣言と実体参照の利用
記述したAPIからヘッダファイルを生成できました。今度はドキュメントの記述を追加して、HTMLやTeXのAPIリファレンスを生成できるようにします。しかし、その前に、XMLの実体宣言と実体参照を使用して、重複する記述を整理しておきます。
クラスInteger2には、thisポインタに相当する引数を第1引数に指定する関数がいくつかあります。それらを実体参照でまとめておきます。実体宣言と実体参照を使用してクラスInteger2を書き直したクラスInteger3を次に示します。
<?xml version="1.0" encoding="euc-jp"?>
<!DOCTYPE class SYSTEM "http://maroontress.com/Sanctuary/2.0/sanctuary.dtd" [
  <!ENTITY thisParam '<param type="struct @ *" name="i"/>'>
]>
<class package="com_example" name="Integer3">
  <namespace/>

  <define name="MAX">
    <macro>0x7fffffff</macro>
  </define>

  <define name="MIN">
    <macro>(-0x7fffffff - 1)</macro>
  </define>

  <typedef type="int" name="t"/>

  <struct tag="@">
    <member type="@_t" name="value"/>
  </struct>

  <method name="new">
    <param type="@_t" name="i"/>
    <return type="struct @ *"/>
  </method>

  <method name="delete">
    &thisParam;
  </method>

  <method name="set">
    &thisParam;
    <param type="@_t" name="value"/>
  </method>

  <method name="get">
    &thisParam;
    <return type="@_t"/>
  </method>
</class>生成されるヘッダファイルには変化はありませんので省略します。
ドキュメントの追加
クラスInteger3にドキュメントを追加した例を次に示します。クラスInteger3にdesc要素を追加したクラスInteger4を次に示します。
<?xml version="1.0" encoding="euc-jp"?>
<!DOCTYPE class SYSTEM "http://maroontress.com/Sanctuary/2.0/sanctuary.dtd" [
  <!ENTITY thisParam '
    <param type="struct @ *" name="i">
      <desc>Integer4クラスのインスタンス</desc>
    </param>
  '>
]>
<class package="com_example" name="Integer4">
  <namespace/>

  <define name="MAX">
    <macro>0x7fffffff</macro>
    <desc><brief>整数の最大値です。</brief></desc>
  </define>

  <define name="MIN">
    <macro>(-0x7fffffff - 1)</macro>
    <desc><brief>整数の最小値です。</brief></desc>
  </define>

  <typedef type="int" name="t">
    <desc><brief>整数値を表す型です。</brief></desc>
  </typedef>

  <struct tag="@">
    <member type="@_t" name="value">
      <desc><brief>現在の整数値を保持します。</brief></desc>
    </member>

    <desc>
      <brief>Integer4クラスのインスタンスとなる構造体です。</brief>
      <p>整数を保持します。</p>
    </desc>
  </struct>

  <method name="new">
    <param type="@_t" name="i">
      <desc>インスタンスの初期化</desc>
    </param>

    <return type="struct @ *">
      <desc>生成したインスタンス、または<code>NULL</code></desc>
    </return>

    <desc>
      <brief>Integer4クラスのインスタンスを生成します。</brief>
      <p>生成できないときはNULLを返します。</p>
    </desc>
  </method>

  <method name="delete">
    &thisParam;

    <desc>
      <brief>Integerクラスのインスタンスを破壊します。</brief>
      <p><arg>i</arg>が<code>NULL</code>のときは何もしません。</p>
    </desc>
  </method>

  <method name="set">
    &thisParam;

    <param type="@_t" name="value">
      <desc>整数値</desc>
    </param>

    <desc><brief>整数値を設定します。</brief></desc>
  </method>

  <method name="get">
    &thisParam;

    <return type="@_t">
      <desc>整数値</desc>
    </return>

    <desc><brief>整数値を取得します。</brief></desc>
  </method>

  <desc>
    <brief>整数値を表す型と、その型への操作を提供します。</brief>
    <p>チュートリアル以外に用途はありません。</p>
  </desc>
</class>
生成されるHTMLファイルは次のようになります。
生成されるTeXファイルそのものは省略しますが、それをPDFに変換したものを次に示します。
生成されるヘッダファイルには変化はありませんので省略します。
パッケージのドキュメント
パッケージのドキュメントを記述することもできます。ただし、パッケージを記述したXMLファイルからヘッダファイルは生成されません。
<?xml version="1.0" encoding="euc-jp"?>
<!DOCTYPE package SYSTEM "http://maroontress.com/Sanctuary/2.0/sanctuary.dtd">
<package name="com_example">
  <desc>
    <p>sanctuaryのサンプルを提供します。</p>
  </desc>
</package>
生成されるHTMLファイルは次のようになります。
簡単なサンプル
上述の例に加え、いくつか簡単なサンプルを用意しました。com_exampleパッケージを次に示します。
- クラス
Integer - 上述のクラス
IntegerXと同じものです。 - クラス
Double - 実数を扱うクラスです。構造体を
typedefで型定義する例です。 - クラス
StringList - 自己参照する構造体の例です。
また、TeXファイルから作成したPDFファイルも用意しておきました。
中級編
共用体
共用体の例として、クラスUnionを次に示します。
<?xml version="1.0" encoding="euc-jp"?>
<!DOCTYPE class SYSTEM "http://maroontress.com/Sanctuary/2.0/sanctuary.dtd">
<class package="foo" name="Union">
  <namespace/>

  <union tag="IntDouble">
    <member type="int #[2]" name="i">
      <desc><brief>int型の配列としてアクセスします。</brief></desc>
    </member>

    <member type="double" name="d">
      <desc><brief>double型としてアクセスします。</brief></desc>
    </member>

    <desc><brief>intの配列(要素数2)とdoubleの共用体です。</brief></desc>
  </union>

  <union alias="UCharUInt">
    <member type="unsigned char #[4]" name="c">
      <desc><brief>unsigned char型の配列としてアクセスします。</brief></desc>
    </member>

    <member type="unsigned int" name="i">
      <desc><brief>unsigned int型としてアクセスします。</brief></desc>
    </member>
    <desc><brief>unsigned charの配列(要素数4)とunsigned intの共用体です。</brief></desc>
  </union>

  <desc>
    <brief>intとdouble、unsigned intとunsigned charのビットマップを相互に変換する機能を提供します。</brief>
  </desc>
</class>生成されるヘッダファイルと、HTMLファイルは次のようになります。member要素のtype属性に含まれる#はname属性の内容で置き換えられます。
#ifndef foo_Union_H
#define foo_Union_H

union foo_Union_IntDouble {
    int i[2];
    double d;
};

typedef union {
    unsigned char c[4];
    unsigned int i;
} foo_Union_UCharUInt;

#ifdef foo_Union_IMPORT
#define Union_IntDouble foo_Union_IntDouble
#define Union_UCharUInt foo_Union_UCharUInt
#endif /* foo_Union_IMPORT */

#endif /* !foo_Union_H */
列挙型
列挙型の例として、クラスWhenceを次に示します。
<?xml version="1.0" encoding="euc-jp"?>
<!DOCTYPE class SYSTEM "http://maroontress.com/Sanctuary/2.0/sanctuary.dtd">
<class package="foo" name="Whence">
  <namespace/>

  <enum tag="@">
    <constant name="SET" value="1">
      <desc><brief>ファイル先頭からのオフセットを表します。</brief></desc>
    </constant>

    <constant name="CUR">
      <desc><brief>現在のファイル位置からのオフセットを表します。</brief></desc>
    </constant>

    <constant name="END">
      <desc><brief>ファイル末尾からのオフセットを表します。</brief></desc>
    </constant>

    <desc>
      <brief>ファイルをシークする際にオフセットの基点を指定する列挙型です。</brief>
    </desc>
  </enum>

  <desc>
    <brief>ファイルのシークに必要な指令を提供します。</brief>
    <p>lseek(2)の引数whenceをenumで表現してみました。</p>
  </desc>
</class>
生成されるヘッダファイルと、HTMLファイルは次のようになります。
#ifndef foo_Whence_H
#define foo_Whence_H

enum foo_Whence {
    foo_Whence_SET = 1,
    foo_Whence_CUR,
    foo_Whence_END
};

#ifdef foo_Whence_IMPORT
#define Whence foo_Whence
#define Whence_CUR foo_Whence_CUR
#define Whence_END foo_Whence_END
#define Whence_SET foo_Whence_SET
#endif /* foo_Whence_IMPORT */

#endif /* !foo_Whence_H */
struct要素(やunion要素)と同様に、enum要素にalias属性を指定することで、列挙型のtypedefも記述できます。
複数行マクロ
マクロ定義の例として、クラスTimeを次に示します。
<?xml version="1.0" encoding="euc-jp"?>
<!DOCTYPE class SYSTEM "http://maroontress.com/Sanctuary/2.0/sanctuary.dtd">
<class package="foo" name="Time">
  <namespace/>

  <define name="add">
    <macroparam name="tvp">
      <desc>timeval構造体のポインタ</desc>
    </macroparam>

    <macroparam name="uvp">
      <desc>timeval構造体のポインタ</desc>
    </macroparam>

    <macroparam name="vvp">
      <desc>和を格納するtimeval構造体のポインタ</desc>
    </macroparam>

    <macro>
do {
  (vvp)->tv_sec = (tvp)->tv_sec + (uvp)->tv_sec;
  (vvp)->tv_usec = (tvp)->tv_usec + (uvp)->tv_usec;
  if ((vvp)->tv_usec >= 1000000) {
    (vvp)->tv_sec++;
    (vvp)->tv_usec -= 1000000;
  }
} while (0)
    </macro>

    <desc>
      <brief>timeval構造体の和を求めます。</brief>
      <p><arg>tvp</arg> + <arg>uvp</arg>の値を計算し、<arg>vvp</arg>に格納します。</p>
      <p><arg>tvp</arg>, <arg>uvp</arg>, <arg>vvp</arg>はtimeval構造体のポインタでなければなりません。</p>
    </desc>
  </define>

  <desc>
    <brief>timeval構造体を演算する操作を提供します。</brief>
  </desc>
</class>
生成されるヘッダファイルと、HTMLファイルは次のようになります。複数行のマクロ定義には自動的にバックスラッシュを展開します。
#ifndef foo_Time_H
#define foo_Time_H

#define foo_Time_add(tvp, uvp, vvp) \
        do { \
          (vvp)->tv_sec = (tvp)->tv_sec + (uvp)->tv_sec; \
          (vvp)->tv_usec = (tvp)->tv_usec + (uvp)->tv_usec; \
          if ((vvp)->tv_usec >= 1000000) { \
            (vvp)->tv_sec++; \
            (vvp)->tv_usec -= 1000000; \
          } \
        } while (0)

#ifdef foo_Time_IMPORT
#define Time_add foo_Time_add
#endif /* foo_Time_IMPORT */

#endif /* !foo_Time_H */ネストする構造体
構造体のメンバとして構造体を定義したい場合は、member要素の代わりにstructmember要素を使用します。structmember要素のname属性には(member要素のname属性と同様に)メンバ名を指定します。構造体のタグ名を指定したい場合はtag属性にタグ名を指定します。tag属性を指定しない場合は、タグ名が匿名の構造体になります。
structmember要素の中にはmember要素をネストすることができます。それにより、ネストする構造体を記述できます。
ネストする構造体の例を次に示します。
<?xml version="1.0" encoding="euc-jp"?>
<!DOCTYPE class SYSTEM "http://maroontress.com/Sanctuary/2.0/sanctuary.dtd">
<class package="foo" name="NestedStruct">
  <namespace/>

  <struct tag="Outer">
    <structmember name="s1">
      <member type="int" name="i">
        <desc><brief>何かの整数値です。</brief></desc>
      </member>

      <tag>
        <desc>
          <brief>匿名の構造体です。</brief>
          <p>匿名の構造体には、便宜上、仮の名前が付けられます。仮の名前は@に続くユニークなID(整数値)となります。</p>
          <p><em>匿名の構造体の説明をここに記述します。</em></p>
        </desc>
      </tag>

      <desc>
        <brief>型が「匿名の構造体」のメンバです。</brief>
        <p><em>メンバs1の説明をここに記述します。</em></p>
      </desc>
    </structmember>

    <structmember tag="Inner" name="s2">
      <member type="int" name="i">
        <desc><brief>何かの整数値です。</brief></desc>
      </member>

      <tag>
        <desc>
          <brief>構造体のメンバとして定義される構造体です。</brief>
          <p>この構造体はトップレベルで定義された場合と同様に扱えます。</p>
          <p><em>構造体Innerの説明をここに記述します。</em></p>
        </desc>
      </tag>

      <desc>
        <brief>型が「foo_NestedStruct_Inner構造体」のメンバです。</brief>
        <p><em>メンバs2の説明をここに記述します。</em></p>
      </desc>
    </structmember>

    <desc><brief>メンバとして構造体を定義する構造体です。</brief></desc>
  </struct>

  <desc><brief>ネストする構造体の例を提供します。</brief></desc>
</class>
生成されるヘッダファイルと、HTMLファイルは次のようになります。
#ifndef foo_NestedStruct_H
#define foo_NestedStruct_H

struct foo_NestedStruct_Outer {
    struct {
        int i;
    } s1;
    struct foo_NestedStruct_Inner {
        int i;
    } s2;
};

#ifdef foo_NestedStruct_IMPORT
#define NestedStruct_Inner foo_NestedStruct_Inner
#define NestedStruct_Outer foo_NestedStruct_Outer
#endif /* foo_NestedStruct_IMPORT */

#endif /* !foo_NestedStruct_H */
構造体のメンバに共用体、列挙型を記述することもできます。また同様に、共用体のメンバにもネストした定義を記述できます。
⚠️ 構造体の定義がネストするようなソースコードを記述することを推奨しているわけではありません。構造体を匿名にすることが重要でなければ、構造体はすべて
struct要素で定義しておきましょう。そして、member要素を使用して構造体型のメンバを記述した方がよいでしょう(例えば、type属性の値をstruct Fooのようにする)。
関数ポインタ型のメンバ
構造体のメンバとして関数ポインタ型のメンバを記述する場合は、member要素の代わりにmethodmember要素を使用します。関数ポインタ型のメンバをもつ構造体の例を次に示します。
<?xml version="1.0" encoding="euc-jp"?>
<!DOCTYPE class SYSTEM "http://maroontress.com/Sanctuary/2.0/sanctuary.dtd">
<class package="foo" name="FunctionMember">
  <namespace/>

  <struct tag="@">
    <methodmember name="func">
      <param type="int" name="in">
        <desc>入力値</desc>
      </param>

      <return type="int">
        <desc>出力値</desc>
      </return>

      <desc><brief>入力に対応する出力を返します。</brief></desc>
    </methodmember>

    <desc><brief>関数ポインタ型のメンバをもつ構造体です。</brief></desc>
  </struct>

  <desc><brief>関数ポインタ型のメンバをもつ構造体の例を提供します。</brief></desc>
</class>
生成されるヘッダファイル、HTMLファイルは次のようになります。
#ifndef foo_FunctionMember_H
#define foo_FunctionMember_H

struct foo_FunctionMember {
    int (*func)(int in);
};

#ifdef foo_FunctionMember_IMPORT
#define FunctionMember foo_FunctionMember
#endif /* foo_FunctionMember_IMPORT */

#endif /* !foo_FunctionMember_H */
⚠️
methodmember要素ではなく、member要素を使用して関数ポインタ型のメンバを記述することもできます(例えば、type属性の値をint (*#)(int)のようにする)。その場合は、引数や戻り値などのドキュメントを指定することができません。また、予め関数ポインタ型をtypedefで型定義しておき、それを使用して記述することもできます。
ヘッダファイルのインクルード
ヘッダファイルの内部で別のヘッダファイルをインクルードする場合は、次のようにinclude要素を使用します。
<?xml version="1.0" encoding="euc-jp"?>
<!DOCTYPE class SYSTEM "http://maroontress.com/Sanctuary/2.0/sanctuary.dtd">
<class package="foo" name="File">
  <namespace/>

  <include file="stdio.h"/>

  <struct alias="@">
    <member type="FILE *" name="file">
      <desc><brief>標準入出力ライブラリのFILE型へのポインタです。</brief></desc>
    </member>

    <desc><brief>Fileクラスのインスタンスとなる構造体です。</brief></desc>
  </struct>

  <method name="new">
    <param type="FILE *" name="file">
      <desc>標準入出力ライブラリのFILE型へのポインタ</desc>
    </param>

    <return type="@ *">
      <desc>Fileクラスのインスタンス、またはNULL</desc>
    </return>

    <desc>
      <brief>Fileクラスのインスタンスを生成します。</brief>
      <p>生成できないときはNULLを返します。</p>
    </desc>
  </method>

  <desc>
    <brief>include要素の使用例を提供します。</brief>
    <p>include要素はドキュメントに影響を与えません。</p>
  </desc>
</class>
生成されるヘッダファイルは次のようになります。
#ifndef foo_File_H
#define foo_File_H

#include <stdio.h>

typedef struct {
    FILE * file;
} foo_File;

#if defined(__cplusplus)
extern "C" {
#endif

foo_File * foo_File_new(FILE * file);

#if defined(__cplusplus)
}
#endif

#ifdef foo_File_IMPORT
#define File foo_File
#define File_new foo_File_new
#endif /* foo_File_IMPORT */

#endif /* !foo_File_H */
⚠️
include要素はヘッダファイルだけに影響があります。
不完全な構造体の定義
型の詳細が隠されている構造体をAPIに記述することがあります。例えば、pthread(3)のpthread_t型や、XlibのRegion型などです。しかし、struct要素ではこのような不透明なデータ型(opaqueなデータ型)を記述することができません。struct要素は完全な構造体を宣言するからです。
Sanctuaryは関数の引数や戻り値、typedefによる型定義、構造体のメンバなどの型(type属性の値)から構造体のタグ名を抽出して、必要な構造体の前方定義をヘッダファイルに出力します。つまり、ほぼ自動的に不完全な構造体を定義(構造体を前方定義)するので、通常は明示的に前方定義する必要はないでしょう。
次のいずれかの方法で、不完全な構造体を定義できます。
export要素を使用するexport要素で構造体のタグを定義し、タグに関するドキ ュメントを記述します。- 同じクラスで定義される構造体ですが、APIにはその構造体のポインタ 型しか現れない場合に使用します。
typedef要素を使用する- 構造体のポインタ型を
typedef要素で宣言します。ドキュメントはtypedef要素に記述します。構造体のタグの前方定義はヘッダファイルのみに出現し、ドキュメントには出現しません。 pthread_t型のようなデータ型を記述する場合に使用します。import要素を使用するimport要素で構造体のタグを定義します。ドキュメント は記述しません。- 例えば、同じクラスで定義したマクロの展開結果に構造体のポインタ型が含まれ、その構造体の詳細が隠蔽されているような場合、その構造体のタグを
import要素で前方定義する必要があるかもしれません。また、GCC拡張の「不完全な列挙型」を記述する場合も必要になります。
export要素の使用例を次に示します。
<?xml version="1.0" encoding="euc-jp"?>
<!DOCTYPE class SYSTEM "http://maroontress.com/Sanctuary/2.0/sanctuary.dtd">
<class package="foo" name="OpaqueStruct">
  <namespace/>

  <export type="struct" tag="@">
    <desc>
      <brief>ある構造体です。</brief>
      <p>構造体の詳細は隠蔽されています。</p>
    </desc>
  </export>

  <method name="new">
    <param type="struct another_Class *" name="s">
      <desc>別のクラスで記述されている構造体のポインタ</desc>
    </param>

    <return type="struct @ *">
      <desc>インスタンスのポインタ</desc>
    </return>

    <desc><brief>別のクラスで定義されている構造体のポインタ型から、不透明なデータ型のインスタンスを生成します。</brief></desc>
  </method>

  <desc><brief>export要素の使用例を提供します。</brief></desc>
</class>
生成されるヘッダファイル、HTMLファイルは次のようになります。
#ifndef foo_OpaqueStruct_H
#define foo_OpaqueStruct_H

struct another_Class;
struct foo_OpaqueStruct;

#if defined(__cplusplus)
extern "C" {
#endif

struct foo_OpaqueStruct * foo_OpaqueStruct_new(struct another_Class * s);

#if defined(__cplusplus)
}
#endif

#ifdef foo_OpaqueStruct_IMPORT
#define OpaqueStruct foo_OpaqueStruct
#define OpaqueStruct_new foo_OpaqueStruct_new
#endif /* foo_OpaqueStruct_IMPORT */

#endif /* !foo_OpaqueStruct_H */import要素の使用例を次に示します。
<?xml version="1.0" encoding="euc-jp"?>
<!DOCTYPE class SYSTEM "http://maroontress.com/Sanctuary/2.0/sanctuary.dtd">
<class package="foo" name="Opaque">
  <namespace/>

  <define name="TYPE">
    <macro>struct another_Class *</macro>

    <desc>
      <brief>コンストラクタの引数の型です。</brief>
      <p>型の詳細は隠蔽されています。</p>
    </desc>
  </define>

  <import type="struct" tag="another_Class"/>

  <typedef type="struct @_ *" name="@">
    <desc>
      <brief>ある構造体のポインタ型です。</brief>
      <p>構造体の詳細は隠蔽されています。</p>
    </desc>
  </typedef>

  <method name="new">
    <param type="@_TYPE" name="s">
      <desc>別のクラスで記述されている構造体のポインタ</desc>
    </param>

    <return type="@">
      <desc>インスタンスのポインタ</desc>
    </return>

    <desc><brief>別のクラスで定義されている構造体のポインタ型から、不透明なデータ型のインスタンスを生成します。</brief></desc>
  </method>

  <desc><brief>import要素の使用例を提供します。</brief></desc>
</class>
生成されるヘッダファイル、HTMLファイルは次のようになります。
#ifndef foo_Opaque_H
#define foo_Opaque_H

#define foo_Opaque_TYPE struct another_Class *

struct another_Class;
struct foo_Opaque_;

typedef struct foo_Opaque_ * foo_Opaque;

#if defined(__cplusplus)
extern "C" {
#endif

foo_Opaque foo_Opaque_new(foo_Opaque_TYPE s);

#if defined(__cplusplus)
}
#endif

#ifdef foo_Opaque_IMPORT
#define Opaque foo_Opaque
#define Opaque_TYPE foo_Opaque_TYPE
#define Opaque_new foo_Opaque_new
#endif /* foo_Opaque_IMPORT */

#endif /* !foo_Opaque_H */同様に、不完全な共用体も定義できます。また、GCCでは不完全な列挙型も定義できます。
⚠️
import要素はヘッダファイルだけに影響があります。
可変長引数
可変長引数の関数を記述するには、次のようにvariableparam要素を使用します。
<?xml version="1.0" encoding="euc-jp"?>
<!DOCTYPE class SYSTEM "http://maroontress.com/Sanctuary/2.0/sanctuary.dtd">
<class package="foo" name="Printer">
  <namespace/>

  <method name="print">
    <param type="const char *" name="format">
      <desc>フォーマット(printf(3)を参照してください)</desc>
    </param>

    <variableparam/>

    <return type="int">
      <desc>出力したバイト数</desc>
    </return>

    <desc>
      <brief>指定したフォーマットに整形した文字列を出力します。</brief>
      <p>いわゆるprintf()ライクな関数です。</p>
    </desc>
  </method>

  <desc><brief>variableparam要素の使用例を提供します。</brief></desc>
</class>
生成されるヘッダファイル、HTMLファイルは次のようになります。
#ifndef foo_Printer_H
#define foo_Printer_H

#if defined(__cplusplus)
extern "C" {
#endif

int foo_Printer_print(const char * format,
                      ...);

#if defined(__cplusplus)
}
#endif

#ifdef foo_Printer_IMPORT
#define Printer_print foo_Printer_print
#endif /* foo_Printer_IMPORT */

#endif /* !foo_Printer_H */グローバル変数
グローバル変数を記述するには、次のようにglobalvariable要素を使用します。
<?xml version="1.0" encoding="euc-jp"?>
<!DOCTYPE class SYSTEM "http://maroontress.com/Sanctuary/2.0/sanctuary.dtd" [
  <!ENTITY maxParameters '3'>
]>
<class package="foo" name="Preference">
  <namespace/>

  <globalvariable type="char *" name="option">
    <desc><brief>オプションを表す文字列です。</brief></desc>
  </globalvariable>

  <globalvariable type="int #[&maxParameters;]" name="parameters">
    <desc>
      <brief>パラメータを表す整数の配列です。</brief>
      <p>配列の要素数は&maxParameters;です。</p>
    </desc>
  </globalvariable>

  <desc>
    <brief>globalvariable要素の使用例を提供します。</brief>
    <p>グローバル変数を使用するべきでありません。設定、取得メソッドをもつシングルトンパターンのクラスを用意すべきです。</p>
  </desc>
</class>
生成されるヘッダファイル、HTMLファイルは次のようになります。
#ifndef foo_Preference_H
#define foo_Preference_H

#if defined(__cplusplus)
extern "C" {
#endif

extern char * foo_Preference_option;
extern int foo_Preference_parameters[3];

#if defined(__cplusplus)
}
#endif

#ifdef foo_Preference_IMPORT
#define Preference_option foo_Preference_option
#define Preference_parameters foo_Preference_parameters
#endif /* foo_Preference_IMPORT */

#endif /* !foo_Preference_H */上級編
関数の修飾子
GCCでは関数の定義に__attribute__((__const__))などの属性を付加することができます。このような属性はmodifier要素で次のように指定することができます。
<?xml version="1.0" encoding="euc-jp"?>
<!DOCTYPE class SYSTEM "http://maroontress.com/Sanctuary/2.0/sanctuary.dtd">
<class package="bar" name="Modifier">
  <namespace/>

  <method name="abort">
    <modifier code="__attribute__((noreturn))"/>
    <desc><brief>コアをダンプして強制終了します。</brief></desc>
  </method>

  <method name="square">
    <param type="int" name="value">
      <desc>整数値</desc>
    </param>

    <modifier code="__attribute__((const))"/>

    <return type="int">
      <desc><arg>value</arg>の自乗の値</desc>
    </return>

    <desc><brief>自乗の値を返します。</brief></desc>
  </method>

  <desc><brief>修飾子の例を提供します。</brief></desc>
</class>
生成されるヘッダファイル、HTMLファイルは次のようになります。
#ifndef bar_Modifier_H
#define bar_Modifier_H

#if defined(__cplusplus)
extern "C" {
#endif

void bar_Modifier_abort(void) __attribute__((noreturn));
int bar_Modifier_square(int value) __attribute__((const));

#if defined(__cplusplus)
}
#endif

#ifdef bar_Modifier_IMPORT
#define Modifier_abort bar_Modifier_abort
#define Modifier_square bar_Modifier_square
#endif /* bar_Modifier_IMPORT */

#endif /* !bar_Modifier_H */splintのアノテーション
splintという静的解析ツール(lintのようなもの)では、/*@...@*/という形式のアノテーションを使用します。Sanctuaryはこのようなコメントを通常とは異なるスタイルで強調表示します。splintのアノテーションを埋め込んだ例を次に示します。
<?xml version="1.0" encoding="euc-jp"?>
<!DOCTYPE class SYSTEM "http://maroontress.com/Sanctuary/2.0/sanctuary.dtd">
<class package="bar" name="Splint">
  <namespace/>

  <export type="struct" tag="@">
    <desc><brief>Splint構造体です。</brief><p>不透明な構造体です。</p></desc>
  </export>

  <method name="initialize">
    <param type="/*@out@*/ struct @ *" name="s">
      <desc>初期化するSplint構造体のポインタ</desc>
    </param>

    <desc><brief>Splint構造体を初期化します。</brief></desc>
  </method>

  <desc><brief>Splintのアノテーションを埋め込んだ例を提供します。</brief></desc>
</class>
生成されるヘッダファイル、HTMLファイルは次のようになります。
#ifndef bar_Splint_H
#define bar_Splint_H

struct bar_Splint;

#if defined(__cplusplus)
extern "C" {
#endif

void bar_Splint_initialize(/*@out@*/ struct bar_Splint * s);

#if defined(__cplusplus)
}
#endif

#ifdef bar_Splint_IMPORT
#define Splint bar_Splint
#define Splint_initialize bar_Splint_initialize
#endif /* bar_Splint_IMPORT */

#endif /* !bar_Splint_H */インタフェース
関数ポインタ、つまりコールバック関数を引数とする関数のAPIドキュメントを書く場合、そのコールバック関数がどのように呼ばれるのか、どのような値を返さなければならないかを記述することになります。DoxyGenなどでは関数ポインタをtypedefで定義して記述することが多いようです。しかし、コールバックされる関数がインスタンスメソッド的な関数の場合、そのインスタンスのインタフェースとして記述したいこともあります。
例として4.4BSDのfunopen(3)を考えてみます。man(1)によると、funopen(3)の定義は次のようになっています。
#include <stdio.h>

FILE *
funopen(const void *cookie, int (*readfn)(void *, char *, int),
    int (*writefn)(void *, const char *, int),
    fpos_t (*seekfn)(void *, fpos_t, int), int (*closefn)(void *));
このAPIはインスタンスのポインタ(cookie)と、その4つのインスタンスメソッド(readfn, writefn, seekfn, closefn)を渡して、FILE構造体へのポインタを返すという、FILE構造体のファクトリーメソッドと捉えてもよいでしょう。つまり、Javaのインタフェースの意味で、あるインタフェースのオブジェクトを引数に指定すると言えます。
そのインタフェースをOpenableインタフェースとすることにして、次のように定義します。
<?xml version="1.0" encoding="euc-jp"?>
<!DOCTYPE interface SYSTEM "http://maroontress.com/Sanctuary/2.0/sanctuary.dtd" [
  <!ENTITY cookieParam '
    <param type="void *" name="cookie">
      <desc>このインスタンスのポインタ</desc>
    </param>'>
]>
<interface package="bar" name="Openable">
  <namespace/>

  <method name="readfn">
    &cookieParam;

    <param type="char *" name="data">
      <desc>読み込むデータを格納する領域のポインタ</desc>
    </param>

    <param type="int" name="size">
      <desc><arg>data</arg>のサイズ</desc>
    </param>

    <return type="int">
      <desc>成功した場合は実際に読み込んだデータのサイズを返します。ファイルの最後の場合は0を返します。そうでなければ<math>-1</math>を返します。</desc>
    </return>

    <desc><brief>ファイルからデータを読み込みます。</brief></desc>
  </method>

  <method name="writefn">
    &cookieParam;

    <param type="const char *" name="data">
      <desc>書き込むデータを格納した領域のポインタ</desc>
    </param>

    <param type="int" name="size">
      <desc><arg>data</arg>のサイズ</desc>
    </param>

    <return type="int">
      <desc>成功した場合は書き込んだデータのサイズを返します。そうでなければ<math>-1</math>を返します。</desc>
    </return>

    <desc><brief>ファイルにデータを書き込みます。</brief></desc>
  </method>

  <method name="seekfn">
    &cookieParam;

    <param type="fpos_t" name="offset">
      <desc>ファイルのオフセット</desc>
    </param>

    <param type="int" name="whence">
      <desc><arg>offset</arg>の起点</desc>
    </param>

    <return type="fpos_t">
      <desc>成功した場合はファイルの先頭からのオフセットを返します。そうでなければ<math>-1</math>を返します。</desc>
    </return>

    <desc>
      <brief>ファイルのオフセットを変更します。</brief>
      <p><arg>whence</arg>の値には<code>foo_Whence_SET</code>、<code>foo_Whence_SET</code>、<code>foo_Whence_END</code>のいずれかを指定します。</p>
    </desc>
  </method>

  <method name="closefn">
    &cookieParam;

    <return type="int">
      <desc>成功した場合は0を返します。そうでなければ<math>-1</math>を返します。</desc>
    </return>

    <desc><brief>ファイルをクローズします。</brief></desc>
  </method>

  <desc><brief>オープン可能なインタフェースの記述例を提供します。</brief></desc>
</interface>
HTMLファイルは次のようになります。
⚠️
interface要素はドキュメントだけを生成します。
一方、Openableインタフェースのオブジェクトを受け取り、Fileクラスのインスタンスを生成するファクトリークラスをFileFactoryクラスとします。FileFactoryクラスを次のように定義します。
<?xml version="1.0" encoding="euc-jp"?>
<!DOCTYPE class SYSTEM "http://maroontress.com/Sanctuary/2.0/sanctuary.dtd">
<class package="bar" name="FileFactory">
  <namespace/>

  <include file="stdio.h"/>

  <method name="open">
    <param type="const void *" name="cookie">
      <desc><hyperlink namespace="bar.Openable">Openableインタフェース</hyperlink>のインスタンス</desc>
    </param>

    <param type="int (*#)(void *, char *, int)" name="readfn">
      <desc>see bar_Openable_readfn()</desc>
    </param>

    <param type="int (*#)(void *, const char *, int)" name="writefn">
      <desc>see bar_Openable_writefn()</desc>
    </param>

    <param type="fpos_t (*#)(void *, fpos_t, int)" name="seekfn">
      <desc>see bar_Openable_seekfn()</desc>
    </param>

    <param type="int (*#)(void *)" name="closefn">
      <desc>see bar_Openable_closefn()</desc>
    </param>

    <return type="foo_File *">
      <desc><hyperlink namespace="foo.File">Fileクラス</hyperlink>のインスタンス、またはNULL</desc>
    </return>

    <desc>
      <brief>OpenableインタフェースからFileクラスのインスタンスを生成します。</brief>
      <p>生成できないときはNULLを返します。</p>
    </desc>
  </method>

  <desc><brief>Fileクラスのインスタンスを生成する機能を提供します。</brief></desc>
</class>
生成されるヘッダファイルと、HTMLファイルは次のようになります。
#ifndef bar_FileFactory_H
#define bar_FileFactory_H

#include <stdio.h>

#if defined(__cplusplus)
extern "C" {
#endif

foo_File * bar_FileFactory_open(const void * cookie,
                                int (*readfn)(void *, char *, int),
                                int (*writefn)(void *, const char *, int),
                                fpos_t (*seekfn)(void *, fpos_t, int),
                                int (*closefn)(void *));

#if defined(__cplusplus)
}
#endif

#ifdef bar_FileFactory_IMPORT
#define FileFactory_open bar_FileFactory_open
#endif /* bar_FileFactory_IMPORT */

#endif /* !bar_FileFactory_H */
アブストラクトメソッド
インタフェースと同様に、インスタンスメソッドとしてコールバックする関数を登録するが、むしろそのクラスを拡張する目的でコールバック関数を登録するようなAPIの場合、インタフェースというよりはJavaのアブストラクトメソッド(もしくはC++のバーチャルメソッド)のように記述したい場合があります。
次のようなThreadクラスを考えてみます。
<?xml version="1.0" encoding="euc-jp"?>
<!DOCTYPE class SYSTEM "http://maroontress.com/Sanctuary/2.0/sanctuary.dtd" [
  <!ENTITY thisParam '
    <param type="struct @ *" name="thread">
      <desc>Threadクラスのインスタンス</desc>
    </param>
  '>
]>
<class package="bar" name="Thread">
  <namespace/>

  <export type="struct" tag="@">
    <desc><brief>スレッドの実体となる構造体です。</brief><p>不透明な構造体です。</p></desc>
  </export>

  <method name="new">
    &thisParam;

    <param type="void (*#)(struct @ *)" name="run">
      <desc>see bar_Thread_run()</desc>
    </param>

    <desc><brief>スレッドのインスタンスを生成します。</brief></desc>
  </method>

  <method name="start">
    &thisParam;
    <desc><brief>新しいスレッドによるbar_Thread_run()の実行を開始します。</brief></desc>
  </method>

  <abstractmethod name="run">
    &thisParam;
    <desc><brief>スレッドが実行する処理を実装します。</brief></desc>
  </abstractmethod>

  <desc><brief>アブストラクトメソッドの例を提供します。</brief></desc>
</class>
生成されるヘッダファイルと、HTMLファイルは次のようになります。
#ifndef bar_Thread_H
#define bar_Thread_H

struct bar_Thread;

#if defined(__cplusplus)
extern "C" {
#endif

void bar_Thread_new(struct bar_Thread * thread,
                    void (*run)(struct bar_Thread *));
void bar_Thread_start(struct bar_Thread * thread);

#if defined(__cplusplus)
}
#endif

#ifdef bar_Thread_IMPORT
#define Thread bar_Thread
#define Thread_new bar_Thread_new
#define Thread_start bar_Thread_start
#endif /* bar_Thread_IMPORT */

#endif /* !bar_Thread_H */
実際どのようにしてThreadクラスを継承したクラスを定義するかはさておき、このように抽象クラスを定義することができます。
⚠️
abstractmethod要素はドキュメントだけを生成します。
ユニットテスト
C言語ではユニットテストをやりにくいものですが、Sanctuaryのスタブ自動生成機能を使用することで、煩雑な作業を減らすことができます。
例として、barパッケージのクラスAlpha、Beta、Gammaからなるライブラリを考えてみます。AlphaはBetaとGammaを使用するクラスで、次のようなAPIを実装しているとしましょう。
#define bar_Alpha_IMPORT
#define bar_Beta_IMPORT
#define bar_Gamma_IMPORT

#include <bar/Alpha.h>
#include <bar/Beta.h>
#include <bar/Gamma.h>

void
Alpha_initialize(/*@out@*/ struct Alpha *a)
{
    Beta_initialize(&a->beta);
    Gamma_initialize(&a->gamma);
    a->flags = 0;
    ⋮
}

⋮
ここではAlpha_initialize()メソッドをテストしてみましょう。
まずユニットテストの準備として、クラスAlpha、Beta、Gammaのソースコードを用意します。
bar/Alpha.cbar/Alpha.xmlbar/Beta.cbar/Beta.xmlbar/Gamma.cbar/Gamma.xml
これらからヘッダファイルとオブジェクトファイルを生成します。
bar/Alpha.hbar/Alpha.obar/Beta.hbar/Beta.obar/Gamma.hbar/Gamma.o
次にソースコードのXMLファイルから次のスタブを生成します(スタブの生成方法はスタブの生成を参照してください)。
stub/bar/Alpha.cstub/bar/Alpha.hstub/bar/Beta.cstub/bar/Beta.hstub/bar/Gamma.cstub/bar/Gamma.h
さらにこれらをコンパイルして、次のオブジェクトファイルを生成します。
stub/bar/Alpha.ostub/bar/Beta.ostub/bar/Gamma.o
これで準備は終わりました。今度はAlphaをテストするプログラムとして、次のようなTestAlpha.c(TestAlphaクラス)を用意します。
#define bar_Alpha_IMPORT
#define bar_Beta_IMPORT
#define bar_Gamma_IMPORT

#include <assert.h>
#include <bar/Alpha.h>
#include <stub/bar/Beta.h>
#include <stub/bar/Gamma.h>

static int betaIsInitialized = 0;
static int gammaIsInitialized = 0;

static void
initializeBeta(struct Beta *b)
{
    betaIsInitialized = 1;
}

static void
initializeGamma(struct Gamma *g)
{
    gammaIsInitialized = 1;
}

void
TestAlpha_testInitialize(void)
{
    struct Alpha a;

    /* Alpha_initialize()が使用する関数をオーバライド */
    stub_bar_Beta_initialize = initializeBeta;
    stub_bar_Gamma_initialize = initializeGamma;

    /* Alpha_initialize()を実行 */
    Alpha_initialize(&a);

    /* 結果の検証 */
    assert(betaIsInitialized && gammaIsInitialized);
    assert(a.flags == 0);
    ⋮
}
これは「TestAlpha_testInitialize()メソッドを呼び出すとAlpha_initialize()メソッドをテストする」というものです。TestAlpha_testInitialize()は、最初にスタブの関数をオーバライドしてから、Alpha_initialize()を呼び出し、最後に結果を検証します(例では説明を簡単にするため、検証にはassert(3)を使用しています)。
TestAlpha.cをコンパイルするときに、次のオブジェクトファイルとリンクします。
bar/Alpha.ostub/bar/Beta.ostub/bar/Gamma.o
TestAlphaがAlpha_initialize()を呼び出したときのシーケンスの概略は次の図のようになります。
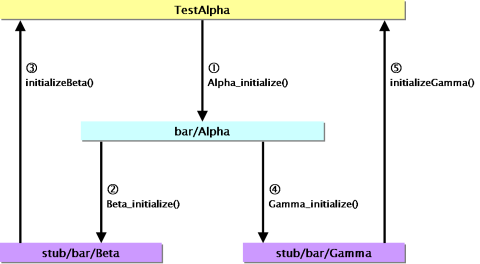
同様に、Beta、Gammaのユニットテストを行うこともできます。